
If you’ve truly won the genetic lottery, it means you were blessed with acne at some point in your life, followed by an inevitable parting gift: acne scarring. In my case, severe PCOS-induced breakouts left a literal minefield on my face. While the active acne eventually calmed down, I’d say that the texture wasn’t the most ideal, especially when we all live in such an image-obsessed society.
After years of hoarding every serum and retinol known to man, and enduring several rounds of microneedling, I found myself in a late-night Reddit rabbit hole. If celebrities can practically age backwards, surely money can buy some level of skin perfection? That unending curiosity led me straight to the world of non-invasive Korean lasers… and I’m so grateful that it did.
It was really overwhelming at first, given the number of options out there, but after hours of research, I settled on trying the Pico Fraxel Laser, mainly because of it’s consistently proven results and low risk levels.
The Clinic Choice: May Clinic, Myeongdong
Since I was already planning to be in Seoul – the undisputed mecca of skincare – it felt like a “now or never” moment. I decided on May Clinic in Myeongdong and overall, it was a “goodish” experience – efficient, professional, and very much the “well-oiled machine” vibe you expect from a popular Seoul clinic, but slightly rough around the edges in terms of service.
The process was straightforward:
- The Consultation: I sat down with the doctor to vent about my texture concerns, and we mapped out a treatment and price plan. It was more brief and laissez-faire than I would’ve liked, but that might have been a cultural difference thing.
- The Prep: I was told to cleanse my skin and wait, and was then called into the treatment room where an assistant applied a thick layer of numbing cream.
- The Wait: I laid there for an hour, slowly losing all sensation in my face while eyeing the laser machine nervously.
- The Treatment: The actual pico fraxel lasering process took about 20 minutes. On the pain scale, it was a solid 5/10, but bare in mind I’ve been hit by a car before, so my pain thresholds are probably quite high. I’d say it felt like a constant barrage of tiny elastic bands snapping against me but, to be honest, the smell of burning skin was the most uncomfortable part for me. There’s nothing quite like the scent of your own epidermis being vaporised to remind you that beauty is pain lol.
- The Settings: In case you were bowled over by my results and wanted a similar treatment, the settings the doctor used were 10mm 0.7J for whole face and 4mm 1.7J for heavy scars.
The “Ugly” Phase (Recovery)
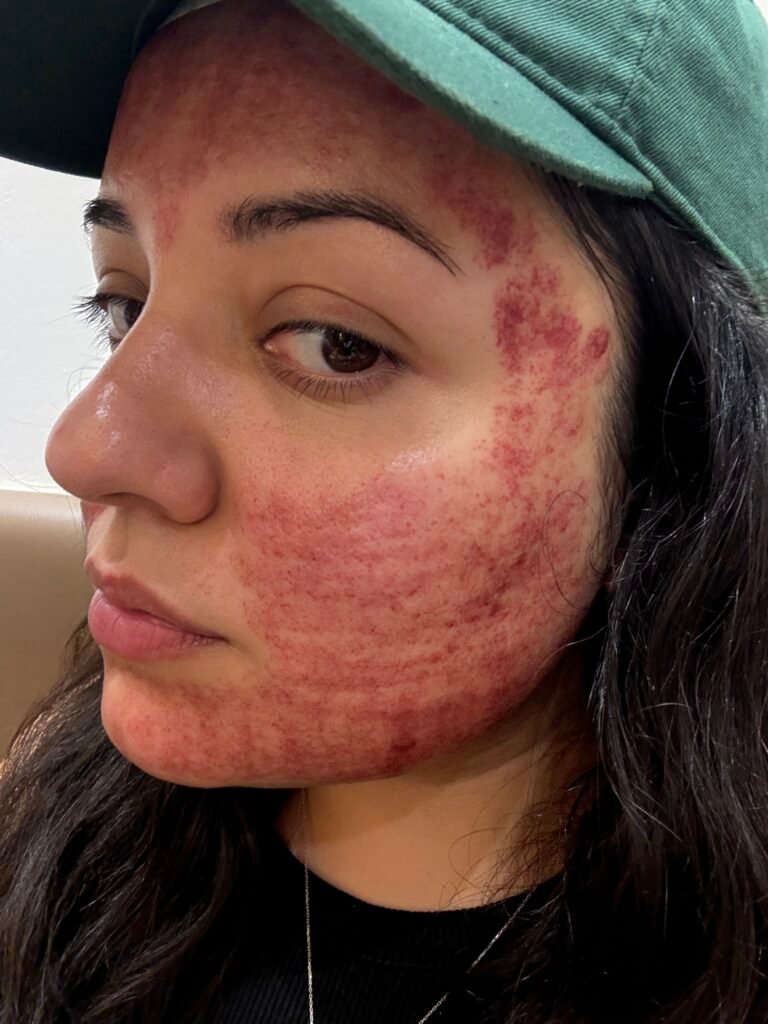
Immediately after, my skin was a sight. It was bleeding everywhere, incredibly hot, swollen, and reached a level of itchiness I didn’t know was possible. The doctor sent me home with a steroid cream and a heavy-duty moisturiser to use for the first three days.
For the next two weeks, my life revolved around hydration. I moisturised multiple times a day, treated the sun like a mortal enemy, and very gently cleansed away the flakes that started falling off. (Pro tip: Don’t scrub! Just let the flakes make their exit naturally, or you risk creating new scars… which would render all your pain pretty pointless)
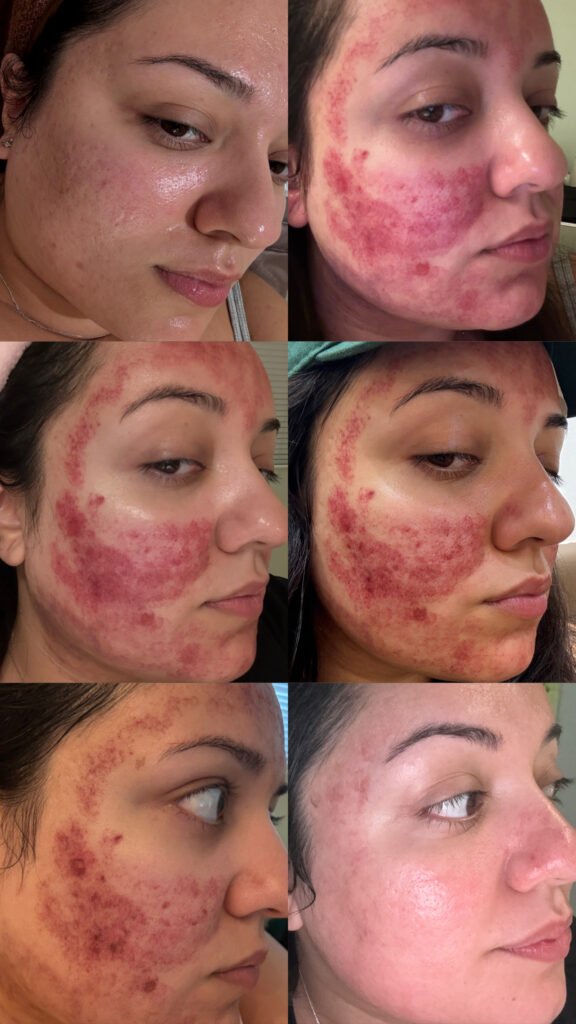
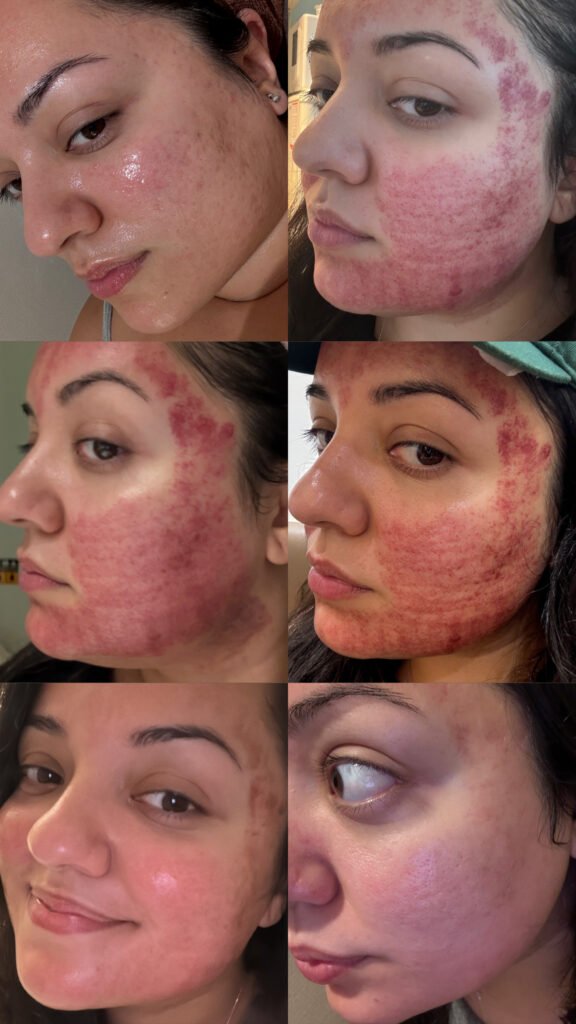
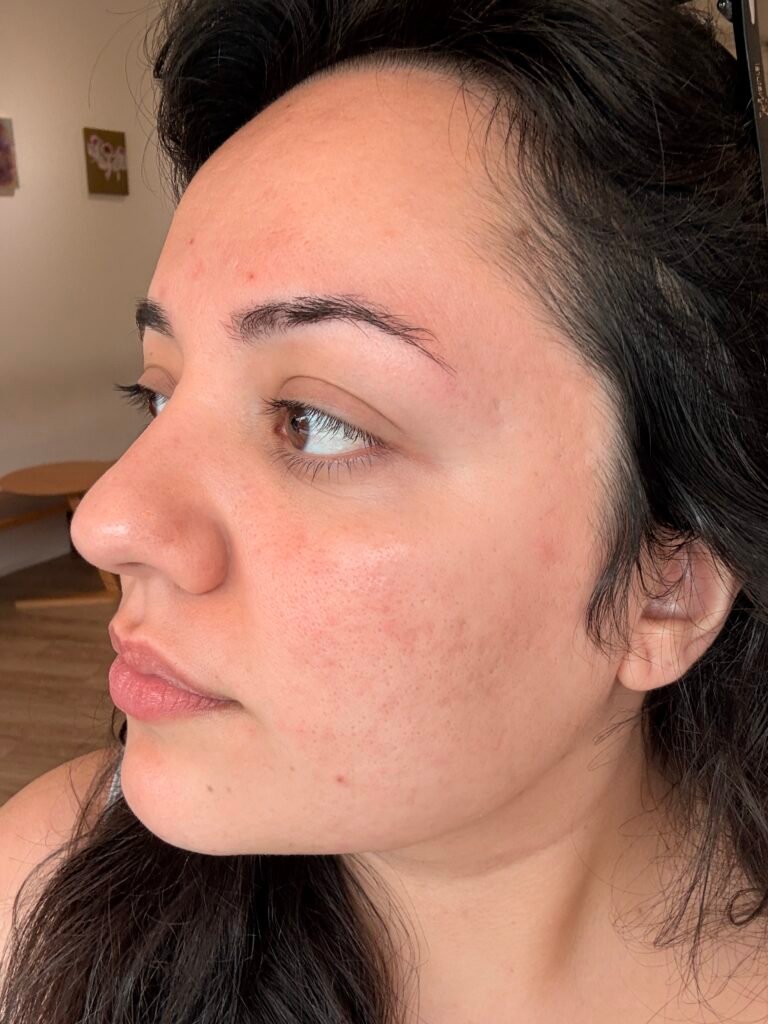
The two images below reflect the left and right side of my face, and the first image in the collection of six you’ll see is my face moments before the treatment, 1 day after, 3 days after, 5 days after, 7 days after, and 9 days after.
The Verdict: Is Pico Fraxel worth it?
I’ll be honest: there were moments during those first few days where I was convinced I had permanently ruined my face, and I was regretting every life choice that led up to that point. I was red, scarred, and really anxious about how things were healing. But around day 7, the dark red marks finally started fading enough to see my skin again.
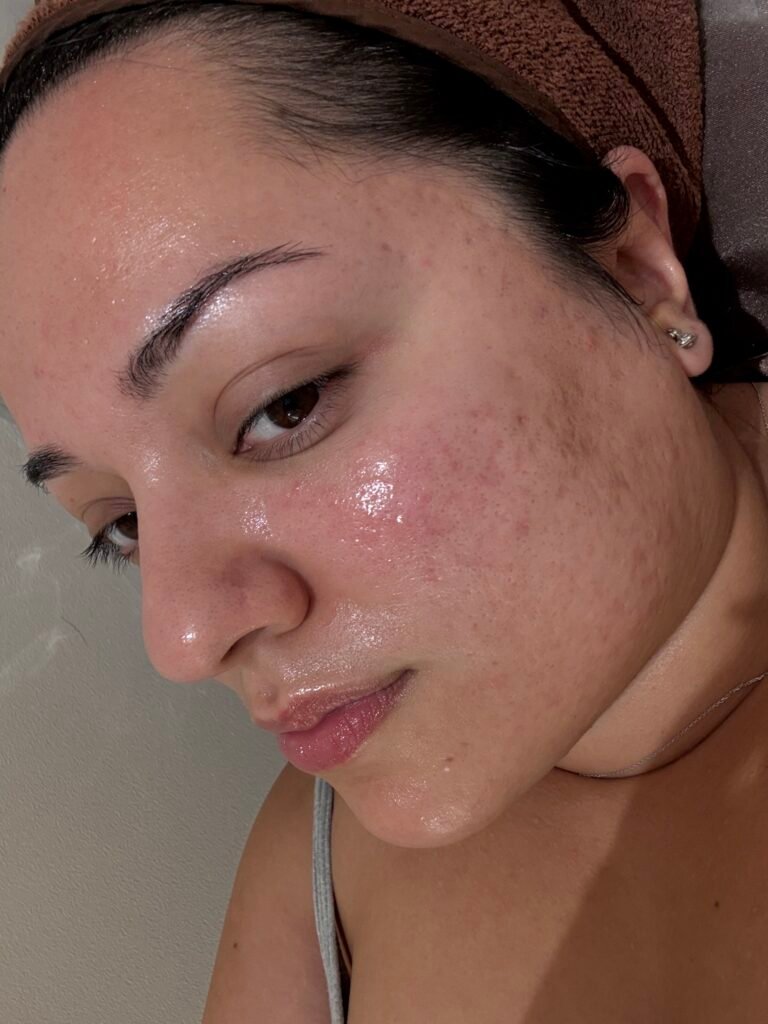
By the four-week mark? My skin was the smoothest it had ever been as an adult. It had a gorgeous, glass-like glow, the texture was dramatically refined, and some of my deepest PCOS acne scars had completely vanished. The wildest part is that this was only the first treatment of the three that were advised.
I was an immediate convert, and I’ll be getting round two as soon as I go back (mainly because a session from a reputable clinic in Seoul costs £80 and a similar treatment in London would be 5 times that, so naturally, I’ve convinced myself it’s more “economical” to just book a massive trip!).
But don’t take my word for it, have a look at the results yourself! 10 out of 10 would pico fraxel again.
MOMENTS BEFORE
5 DAYS IN
4 WEEKS AFTER
A Final Note
Who, What & Why
If you’ve made it this far — hello, I’m Aila! I walked away from a decade in corporate tech to redesign my life around the things that I actually care about: creative work, slow travel, and being generally helpful to other humans. These days my husband and I split our time between London (caring for my mother) and various spots across Asia.
Whether I’m strolling through markets in Bangkok, systematically eating my way through Japanese ramen shops, testing skin treatments in South Korea or documenting what it actually looks like to leave a stable career and build something new — the goal is always the same: share the real version of our travels so you can make the most of your trip. If you ever find any of it useful and want to support my work to keep the site ad-free, you can do that here. 🙂
If you prefer watching over reading, most of what I cover here also lives on YouTube — the entrepreneurship side of things, travel, and the honest version of building a fulfilling life. I also run a more philosophical vlog channel here if that’s more your speed.
Explore the Archives
If you’ve enjoyed reading this blog post, there’s plenty more where that came from! Have a wander through the sections below:
- Food: I’m a firm believer that you get the best feel for a city through its food and drinks. Check out my archives for deep dives on food all over the world and, if you’re going to Japan, start with my pride and joy: 29 Ramen Better Than Ichiran.
- Travel & Nomadic Life: Whether you’re planning a one-week holiday or a total life pivot into digital nomadism, I’ve likely written a guide for it. Dive into the archives for my unfiltered take on what to see, eat, drink, and — perhaps most importantly — skip. You can start with the Seoul edit if you like!
- Health & Beauty: Beyond trying to be a functioning human, I do deep dives on health (PCOS, Visual Snow) and the reality of beauty (make-up, skincare & treatments). You’ll find my honest results on everything from non-invasive laser treatments to long-term wellness.
If you end up trying any of my recommendations, let me know in the comments section or reach out – I’d love to hear what you thought.
The Essentials
A couple of things I use on every trip that keep me functional:
- Connectivity: Nomad eSIM — easy setup, works everywhere, no SIM card stress.
- Privacy: NordVPN — for public WiFi and keeping my Netflix region exactly where I want it.
Want to stay “in the know”?
Every month I share a newsletter with a round-up of all my content, as well as other handy resources. Sign up below to receive it so you don’t miss anything – from thorough travel guides to organisational systems that actually make life easier.
Pingback: The Complete Seoul Travel Guide: What To See, Eat & Drink In 2026 | Aila Collins | Entrepreneur & Digital Creator